Sound Output
The PicoMite firmware can play stereo WAV, FLAC, MP3 or MOD files located on the Flash Filesystem or
SD Card and generate precise sine waves using the PLAY command.
Note that the switching power regulator on the Raspberry Pi Pico can cause some noise on the audio output. This can be reduced by disabling the regulator and powering the module via an external linear regulator.
Pulse Width Modulated (PWM) Signal
The audio is created using PWM outputs so before the PLAY commands can be used the PWM output pins
must be allocated as audio outputs:
This is done using the OPTION AUDIO command as follows:
OPTION AUDIO PWM-A-PIN, PWM-B-PIN
This command should be entered at the command prompt and will be saved, so it only needs to be run once. Both pins must be on the same PWM channel with PWM-A-PIN the left audio channel and PWM-B-PIN the right.
For example:
OPTION AUDIO GP0, GP1
The audio signal is superimposed on a 44KHz square wave (called the carrier wave) as a pulse width modulated (PWM) signal. This means that a low pass filter is required to remove the carrier and recover the audio signal.
Filter Circuits
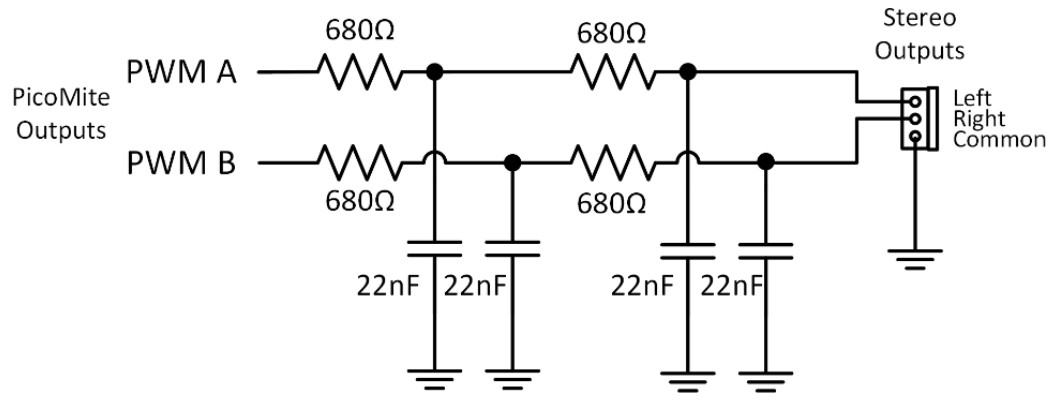
Most low cost amplified speakers (for a personal computer) will not respond to the carrier frequency so they will act as a low pass filter in themselves. Therefore, if you want to keep it simple, you can directly connect the PWM output to an amplified speaker’s input and a reasonable sound output should be achieved. However, the high level of the 44KHz carrier may cause problems for the amplifier (eg, overheating or distortion) so the following filter is recommended. This removes most of the carrier and delivers about 2V peak to peak (0.6V RMS) with reasonable fidelity up to 8KHz (more than enough for most amplified speakers):
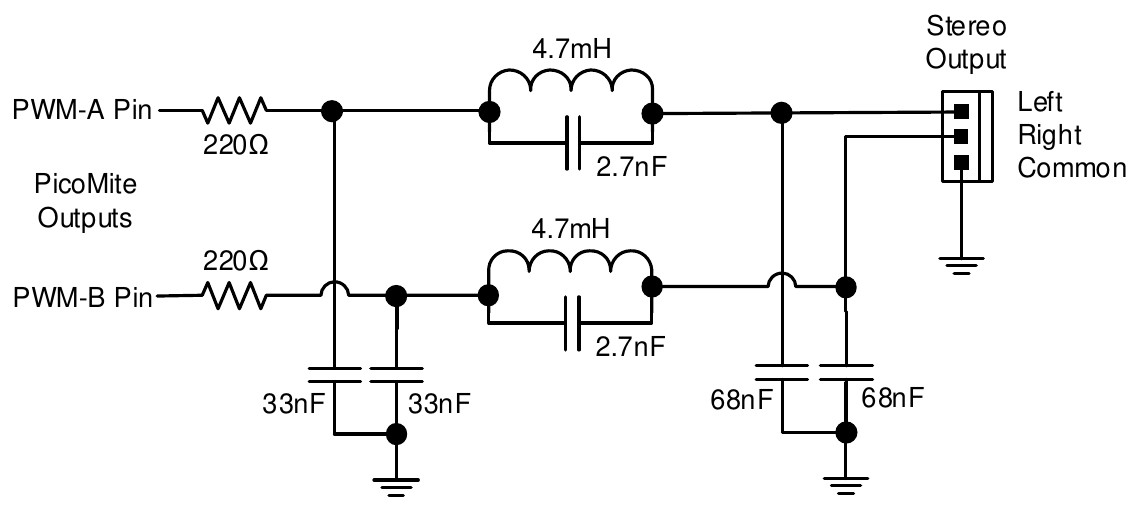
Below is a superior circuit producing quality audio with an insignificant amount of the carrier remaining. This is suitable for a more sophisticated HiFi amplifier/speaker configuration. The output is good for 10Hz to 15KHz at about 3V peak to peak (1V RMS) at 1KHz.
Both circuits are designed to feed an amplifier (not directly drive a headphone or speaker) and rely on capacitor coupling into the following amplifier (most have this).
VS1053 support
The audio output can be generated using a VS1053 CODEC module which is configured using the command
OPTION AUDIO VS1053 CLKpin, MOSIpin, MISOpin, XCSpin, XDCSpin, DREQpin,XRSTpin
This requires no output filtering and can drive 32Ω headphones direct. It also supports additional playback capabilities.
If a VS1053 codec is used as the audio output device, additional commands are available:
PLAY MP3 file$, interrupt
PLAY MIDIFILE file$, interrupt
PLAY MIDI
PLAY MIDI CMD cmd%, data1% [,data2%]
PLAY NOTE ON channel, note, velocity
PLAY NOTE OFF channel, note [,velocity]
PLAY HALT
PLAY CONTINUE track$
PLAY STREAM buffer%(), readpointer%, writepointer%
These are explained in more detail in the commands listing section.
MCP48n2 DAC
The audio output can also be generated through a connected MCP48n2 DAC (eg, MCP4822) in which case it is configured using the command:
OPTION AUDIO SPI CS-PIN, CLK-PIN, MOSI-PIN
The DAC does not need a complex low pass filter and a 120Ω resistor connected to the DAC output with the other end of the resistor connected to GND via a 100nF capacitor will be adequate. When a MCP4822 is used the LDAC pin on the DAC should be connected to GND.
I2S DAC
The audio output can also be generated though an I2S DAC such as the PCM5102A. The DAC must support creating its own master clock as this is not created by the firmware. The I2S DAC on the Pico2 (RP2350A/B) uses PIO2 to generate the output so this will not be available when the I2S DAC is enabled. The I2S DAC on the RP2040 uses PIO 0 which is shared with the VGA PIO on VGA versions.
The I2S DAC is configured with the command:
OPTION AUDIO I2S BCLK-PIN, DIN-PIN
The I2S word clock (LRCK) will then be on the next pin to the BCLK. So, for example if BCLK is set to GP0 then LRCK will be on GP1. Both these pins and the DIN pin must be unused when the command is issued. Typically, the DAC module will also require a GND and power pin to be connected (typically 5V) The I2S DAC will produce CD quality audio from FLAC files and output from MP3 files limited only by the inherent MP3 compression. FLAC files up to 96000Hz and 24-bit have been tested.
Playing WAV, FLAC, MP3 and MOD Files
The PLAY command can play a WAV, FLAC, MP3 (RP2350 only) or MOD file residing on the Flash Filesystem or SD Card to the sound output. It can be used to provide background music, add sound effects to programs and provide informative announcements.
The commands are:
PLAY WAV file$, interrupt
PLAY FLAC file$, interrupt
PLAY MODFILE file$, interrupt
PLAY MP3 file$, interrupt ‘RP2350 only
‘file$’ is the name of the audio file to play. It must be on the Flash Filesystem or SD Card and the appropriate extension (eg .WAV) will be appended if missing. The audio will play in the background (ie, the program will continue without pause). ‘interrupt’ is optional and is the name of a subroutine which will be called when the file has finished playing.
Generating Sine Waves
The PLAY TONE command uses the audio output to generate sine waves with selectable frequencies for the left and right channels. This feature is intended for generating attention catching sounds but, because the frequency is very accurate, it can be used for many other applications. For example, signalling DTMF tones down a telephone line or testing the frequency response of loudspeakers.
The syntax of the command is:
PLAY TONE left, right, duration, interrupt
‘left’ and ‘right’ are the frequencies in Hz to use for the left and right channels.
The tone plays in the background (the program will continue running after this command) and ‘duration’ specifies the number of milliseconds that the tone will sound for. ‘duration’ is optional and if not specified the tone will continue until explicitly stopped or the program terminates. ‘interrupt’ (if specified) will be triggered when the duration has finished.
The specified frequency can be from 1 Hz to 20 KHz and is very accurate (it is based on a crystal oscillator). The frequency can be changed at any time by issuing a new PLAY TONE command.
Using PLAY
It is important to realise that the PLAY command will generate the audio in the background. This allows a
program (for example) to play the sound of a bell while continuing with its control function. Without the
background facility the whole BASIC program would freeze while the sound was played.
However, generating the audio in the background has some subtle inferences which can trip up newcomers.
For example, take the following program:
PLAY TONE 500, 500, 2000
END
You may expect the 500Hz tone to sound for 2 seconds but in practice it will not make any sound at all. This is because MMBasic will execute the PLAY TONE command (which will start generating the sound in the background) and then it will immediately execute the END command which will terminate the program and the background sound. This will happen so fast that nothing is heard.
Similarly the following program will not work either:
PLAY TONE 500, 500, 2000
PLAY TONE 300, 300, 5000
This is because the first command will set a 500Hz the tone playing but then the second PLAY command will
immediately replace that with a 300Hz tone and following that the program will run off the end terminating the
program (and the background audio), resulting in nothing being heard.
If you want MMBasic to wait while the PLAY command is doing its thing you should use suitable PAUSE
commands. For example:
PLAY TONE 500, 500 : PAUSE 2000
PLAY TONE 300, 300 : PAUSE 5000
PLAY STOP
This applies to all versions of the PLAY command including PLAY WAV.
Utility Commands
There are a number of commands that can be used to manage the sound output:
| Command | Description |
|---|---|
| PLAY PAUSE | Temporarily halt (pause) the currently playing file or tone. |
| PLAY RESUME | Resume playing a file or tone that was previously paused. |
| PLAY NEXT | Play the next WAV, MP3 or FLAC file in a directory |
| PLAY PREVIOUS | Play the previous WAV, MP3, or FLAC file in a directory |
| PLAY STOP | Terminate the playing of the file or tone, same as when the program ends. |
| PLAY VOLUME L, R | Set the volume to between 0 and 100 with 100 being the maximum volume. The volume will reset to the maximum level when a program is run. A logarithmic scale is used so that PLAY VOLUME 50,50 should sound half as loud as 100,100. |
Specialised Audio Output
The PLAY SOUND command will generate an output based on a mixture of sine, square, etc waveforms. See
the details in the command listing.